Claye Feld Sources

Free Computer Assistance, Tutorial, User Guide, Skype Conference, VNC Assistance for Mac OS, iPhone OS and Windows OS.

Showing posts with label iPhone. Show all posts

It will be fantastic if you can use Fring with your data plan. Now it's possible.

What is fring?

Fring is a mobile internet service & community that enables you to access & interact with your social networks on-the-go, make free calls and live chat with all your fring, Skype®, MSN® Messenger, Google Talk™, ICQ, SIP, Twitter, Yahoo!™ and AIM®* friends using your handset’s internet connection.

You'll need:
1. Fring installed. You can download it on the App Store.
2. A jaibroken iPhone.
3. Cydia installed.

Launch Cydia and search for "Mobile Substrate" and "VoIPover3G" and install them.


Restart your iPhone, launch Fring and you should be able to use it over the Edge/3G


It's fringing freedom!


What is CopierciN?

CopierciN is an extended text editor with copy/paste functionality and import/export features among different applications (SMS, Contacts, Mail, Notes and Safari).

What you will need:
- A jailbroken iPhone (Want to know how? Just ask and we'll make a guide)
- Cydia installed
- CopierciN installed

Be aware that it is still beta. You'll see some bugs.

Step 1: Write something in the field then press at the end of the text until the magnifying glass appears. Then, drag your finger from the right to the left.


Step 2: Press "Copy" and press "Menu". Choose "export text as".


Voila!!!


What is PdaNet?

PdaNet, made hugely popular with Windows Mobile and PalmOS, is now released for the iPhone. It allows your laptop (or desktop) to go online wirelessly by connecting it to your iPhone through wifi. PdaNet goes through the unlimited data plan on your phone and does not require any extra service. PdaNet turns your iPhone into a true WIFI router.

- First you will need a jailbroken iPhone to be able to install PdaNet.
- Go to Cydia. Search for PdaNet and install it.
- You will need to connect your iPhone and your mac (or PC) peer-to-peer (ad hoc), then launch PdaNet again.

How do I create an Peer-to-Peer (ad-hoc) network on my computer?

*In each of the following instructions WEP network key is optional but strongly recommended. Without it all computers/iPhones nearby could potentially connect to your computer AND your iPhone!

On Windows XP,

  1. Go to Control Panel->Network Connections, then right click on Wireless Network Connection and select Properties from the menu.
  2. Select Wireless Networks tab, under Preferred networks, click Add.
  3. Give a name to your network in the SSID box such as "iPhoneNet".
  4. Check "This is a computer-to-computer (ad-hoc) network and select "OK" to close the settings.
  5. Now on your iPhone go to Settings->WiFi and "iPhoneNet" should show up in the list unless your computer is already connected to a router. Tap on it and your computer should go online.

On Mac,

  1. Click on the Airport icon at the top of the screen.
  2. Select Create Network, give it a name such as "iPhoneNet".
  3. Now on your iPhone go to Settings->WiFi and "iPhoneNet" should show up in the list. Tap on it and your computer should go online.

What is the VNC protocol?

Virtual Network Computing (VNC) is a graphical desktop sharing system to remotely control another computer. It transmits the keyboard and mouse events from one computer to another, relaying the graphical screen updates back in the other direction, over a network.

What is Mocha VNC software?

Mocha VNCprovides access to a VNC server. Using your iPhone, you can connect to a Windows PC or a Mac OS X and see the files, programs, and resources exactly as you would if you were sitting at your desk, just on a smaller screen.

Download Mocha VNC: Here

LITE VERSION

Compared to the Lite version the full version has:
- Another cool key board
- Support for right mouse button
- Text macro support
- Ctrl+alt+del key. Needed if using Win 200x as a VNC Server

FEATURES

- Standard VNC protocol with encrypted password signon
- 8 and 32 bit color modes
- Local Mouse support
- Zoom and scroll as the Safari browser
- Landscape mode
- Can handle 20 different Host configurations
- Has been tested with RealVNC, TightVNC, UltrVNC on Windows, and Apple Remote Management, which is included with the Mac OS X.

Step 1: Make sure the computer you want to control is ready to listen Mocha VNC.
-If your using a PC, install TightVNC (free): Here
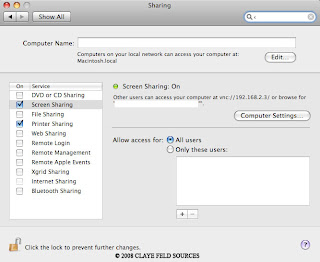
-If your using a Mac, just enable "screen sharing". Go to System Preferences > Sharing.
-Your Firewall should be open for port 5900. This is the port used for VNC protocol.

Mac Os X:
Windows XP - TightVNC Properties:

Firewall Setup

Step 2: Now that you computer is ready to listen. Install Mocha VNC from the App Store:
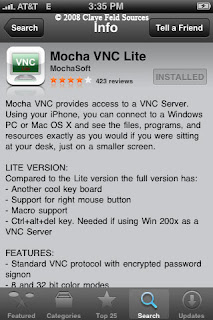

Step 3: After the install press "connect" and "edit"
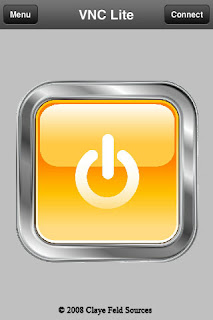

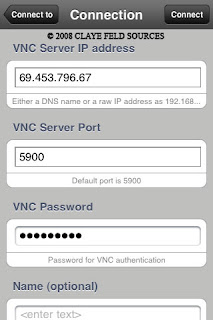
You should see that:
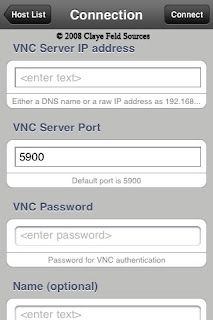
Step 4: You IP address Should be this one Dynamic IP Tracing - Show My IP Information
Enter your password that you setup with "TightVNC" or "Screen Sharing"


Press "connect" and you will be able to control your computer:

  1. Choose the screen you want to create an image of.
  2. While holding the Home button, press and release the Sleep/Wake button. Your iPhone will flash and snap letting you know that the screenshot was taken.
  3. the screenshot will be in the camera roll's folder.


With iTunes Version 7.4.1, Apple has added a custom ringtone maker for the iPhone, allowing users to select some tracks from iTunes and convert them into song that plays when a call is received or when the alarm sounds. "Some" is the key word -- not all songs on iTunes are elligible for the ringtone treatment.
In any event, if the song has a bell icon next to it in the iTunes Store, you can buy the song for $.99 and then convert it into a ringtone for another $.99 -- hence the $1.98 total ringtone price. It's a two-step process unless you previously bought the eligible song from iTunes. Wait there.....

Let's do it differently

What you will need:

-Mac OS
-GarageBand
-iTunes

Step 1: Create new project and create new real instrument track in Garageband


Step 2: Now drag you favorite MP3, WAV.... into Garageband on the track you just create.


Garageband will convert your song:


Step 3: Go to > share and send ringtone to iTunes


Garageband will ask to adjust the ringtone for 40 sec or less, click Adjust:


Now you will see the yellow cycle region on the top of the track as show bellow:


Step 4: Now you can move it from left to right to customize your ringtone. when you're done, click again to "send ringtone to iTunes"


Your ringtone will be ad to iTunes:


Apple, the Apple logo, Garageband, iTunes and iPod are trademarks of
Apple Inc., registered in the U.S. and other countries. iPhone is a trademark
of Apple Inc.


Unlocked and Jailbreak your iPhone first generation or only Jailbreak your iPhone 3G. Go take a look at:

http://blog.iphone-dev.org

P.S: If you want a step by step guide with pictures. Let me know and I will do it.

Subscribe to: Posts (Atom)

Discussion


ShoutMix chat widget

© 2008 Claye Feld Sources